在 Archlinux 服务器上安装 dendrite 实现分布式聊天
Matrix是一种用于实时通信的开放协议。它允许拥有一个通信服务提供商帐户的用户与不同服务提供商的用户进行网络聊天,IP语音和视频通话。也就是说,它旨在使不同服务提供商之间的实时通信无缝工作,就像使用电子邮件一样。采用该协议的软件有Element.io等。
最近群友在搭建Matrix客户端,刚好我有一台闲置的Arch服务器,买了不用一直浪费,参考群友的教程搭建了一个Matrix,使用的是Dendrite作为后端,Dendrite 是基于 Go 的第二代 Matrix 客户端,性能比用Python编写的Synapse服务器强。下面是记录本次安装的流程。
安装 nats-server
yay -S nats-server
这个软件只在Aur上有,所以如果你在服务器使用的是root用户,可以先在本地打包后放到服务器安装。
git clone https://aur.archlinux.org/nats-server.git
cd nats-server
makepkg -s
会生成arch的软件包,复制到服务器,使用命令pacman -U ./xxxxx.zst安装软件。
然后编辑 nats-server 的 service 文件
systemctl edit --full nats-server.service
将 ExecStart 行修改为(加上 -js)
ExecStart=/usr/bin/nats-server -js --pid /run/nats-server.pid --syslog --http_port 8222
然后启动 nats-server并加入开机自启。
systemctl enable --now nats-server
安装 PostgreSQL
pacman -S postgresql
在这里给postgres用户设置密码 passwd postgres
postgres是安装PostgreSQL生成的用户,具体名字看安装后的提示。
初始化数据库:
sudo -u postgres initdb --locale=en_US.UTF-8 -E UTF8 -D /var/lib/postgres/data
启动PostgreSQL,添加 PostgreSQL 到daemons列表里作为守护进程同时启动:
systemctl enable postgresql.service --now
初始化数据库后加要创建dendrite需要使用的用户以及数据库:
sudo -u postgres createuser -P dendrite
创建用户的时候需要输入密码(假设叫 PASSWORD),记得密码不要包含特殊字符,比如(#),否则会导致 config.yaml 解析出错。
创建一个数据库给dendrite使用:
sudo -u postgres createdb dendrite
安装 Dendrite
Dendrite也在Aur,无法使用pacman安装,参考上面的方法安装。
yay -S dendrite
每一个 dendrite 安装都需要
- 一个唯一的
Matrix签名私钥 - 一个有效、被信任的
TLS证书和私钥
首先我们生成一个 Matrix 签名私钥:
dendrite-generate-keys --private-key matrix_key.pem
注意: 保管好这个私钥,在同一个域名下重新安装 dendrite(或者其他 Matrix 服务端) 的时候,你会需要这个 key。如果失去了这个 key, 你在加入federated rooms 的时候会遇到问题。
之后就是生成配置文件。archlinux 有个很棒的脚本叫做 dendrite-generate-config,我们看一下它的用法:
dendrite-generate-config -h
Usage of dendrite-generate-config:
-ci
sane defaults for CI testing
-db string
The DB URI to use for all components if not SQLite files
-server string
The domain name of the server if not 'localhost'
因此,我们用如下命令来生成配置文件,注意把 PASSWORD 替换为你的 dendrite 数据库用户密码。把 chat.liyp.cc 替换为你准备用来提供服务的域名。
dendrite-generate-config -db 'postgres://dendrite:PASSWORD@localhost/dendrite?sslmode=disable' -server chat.liyp.cc >config.yaml
上面的命令是一行写完的,不要换行。
然后我们看一下默认的配置, 运行 cat config.yaml (如果你想使用完整的配置进行修改,参考 dendrite sample config)
version: 2
global:
server_name: chat.liyp.cc
private_key: matrix_key.pem
old_private_keys: []
......
修改第四行:
- private_key: matrix_key.pem
+ private_key: /etc/dendrite/matrix_key.pem
然后将配置文件与私钥复制到 /etc/dendrite,
cp matrix_key.pem config.yaml /etc/dendrite
然后就可以开启自启动并立即启动啦。
systemctl enable --now dendrite
看一下是否启动成功:
systemctl status dendrite
成功的话,会有类似如下的输出:
Feb 28 23:26:45 tencent-arch dendrite[961838]: [961838] [INF]
Feb 28 23:26:45 tencent-arch dendrite[961838]: [961838] [INF] ---------------- JETSTREAM ----------------
Feb 28 23:26:45 tencent-arch dendrite[961838]: [961838] [INF]   Max Memory:      2.87 GB
Feb 28 23:26:45 tencent-arch dendrite[961838]: [961838] [INF]   Max Storage:     41.82 GB
Feb 28 23:26:45 tencent-arch dendrite[961838]: [961838] [INF]   Store Directory: "/var/cache/dendrite/jetstream"
Feb 28 23:26:45 tencent-arch dendrite[961838]: [961838] [INF] -------------------------------------------
Feb 28 23:26:45 tencent-arch dendrite[961838]: [961838] [INF] Server is ready
Feb 28 23:26:45 tencent-arch dendrite[961838]: time="2022-02-28T15:26:45.596884493Z" level=info msg="Enabled perspective key fetcher" num_public_keys=2 se>
Feb 28 23:26:45 tencent-arch dendrite[961838]: time="2022-02-28T15:26:45.623562213Z" level=info msg="Enabling server notices at /_synapse/admin/v1/send_se>
Feb 28 23:26:45 tencent-arch dendrite[961838]: time="2022-02-28T15:26:45.664262183Z" level=info msg="Starting external Monolith listener on :8008"
添加 Nginx 配置
Github 的说明真是不够详细,nginx 的配置还要自己找。
我们先进入 Nginx 存放配置的文件夹 (没有的话可以先创建)
cd /srv/nginx/conf.d/
写入配置文件:
vim dendrite.conf
写入以下内容 (粘贴自 monolith-sample.conf ), 注意修改域名为你自己的域名,比如我的 chat.liyp.cc, ssl 那三行下面再说。注意自己添加那两行 default_type application/json;
#change IP to location of monolith server
upstream monolith{
    server 127.0.0.1:8008;
}
server {
    listen 443 ssl; # IPv4
    listen [::]:443 ssl; # IPv6
    server_name my.hostname.com;

    ssl_certificate /path/to/fullchain.pem;
    ssl_certificate_key /path/to/privkey.pem;
    ssl_dhparam /path/to/ssl-dhparams.pem;

    proxy_set_header Host      $host;
    proxy_set_header X-Real-IP $remote_addr;
    proxy_read_timeout         600;

    location /.well-known/matrix/server {
        default_type application/json;
        return 200 '{ "m.server": "my.hostname.com:443" }';
    }

    location /.well-known/matrix/client {
        # If your sever_name here doesn't match your matrix homeserver URL
        # (e.g. hostname.com as server_name and matrix.hostname.com as homeserver URL)
        # add_header Access-Control-Allow-Origin '*';
        default_type application/json;
        return 200 '{ "m.homeserver": { "base_url": "https://my.hostname.com" } }';
    }

    location /_matrix {
        proxy_pass http://monolith;
    }
}
我的改好大概是这样子(就是把 my.hostname.com 改为 chat.liyp.cc)
#change IP to location of monolith server
upstream monolith{
	server 127.0.0.1:8008;
}
server {
	listen 443 ssl; # IPv4
	listen [::]:443 ssl; # IPv6
	server_name m.sukanka.com;

	ssl_certificate /path/to/fullchain.pem;
    ssl_certificate_key /path/to/privkey.pem;
    ssl_dhparam /path/to/ssl-dhparams.pem;


	proxy_set_header Host      $host;
	proxy_set_header X-Real-IP $remote_addr;
	proxy_read_timeout         600;

	location /.well-known/matrix/server {
		return 200 '{ "m.server": "chat.liyp.cc:443" }';
}

	location /.well-known/matrix/client {
		# If your sever_name here doesn't match your matrix homeserver URL
		# (e.g. hostname.com as server_name and matrix.hostname.com as homeserver URL)
		# add_header Access-Control-Allow-Origin '*';
		return 200 '{ "m.homeserver": { "base_url": "https://chat.liyp.cc" } }';
}

	location /_matrix {
		proxy_pass http://monolith;
	}
}
SSL证书可以自己申请,也可以用aur里面的certbot软件自动获取,我是在腾讯云自己下载的证书,下面使用cerbot申请证书:
yay -S certbot
certbot #运行
根据提示设置即可。
如果自己申请证书,自己填写SSL前两行的路径即可,第三行需要使用命令行生成文件。
openssl dhparam -out dhparams.pem 2048
然后编辑dendrite.conf的Nginx配置服务器:
vim dendrite.conf
ssl_dhparam /path/to/dhparams.pem; #设置刚刚生成的文件路径
我的dendrite.conf 文件,你的应该类似。
#change IP to location of monolith server
upstream monolith{
    server 127.0.0.1:8008;
}
server {
    listen 443 ssl; # IPv4
    listen [::]:443 ssl; # IPv6
    server_name chat.liyp.cc;

    ssl_certificate /srv/cert/chat.liyp.cc/chat.liyp.cc.pem;
    ssl_certificate_key /srv/cert/chat.liyp.cc/chat.liyp.cc.key;
    ssl_dhparam /srv/cert/chat.liyp.cc/dhparams.pem;

    proxy_set_header Host      $host;
    proxy_set_header X-Real-IP $remote_addr;
    proxy_read_timeout         600;

    location /.well-known/matrix/server {
        default_type application/json;
        return 200 '{ "m.server": "chat.liyp.cc:443" }';
    }

    location /.well-known/matrix/client {
        # If your sever_name here doesn't match your matrix homeserver URL
        # (e.g. hostname.com as server_name and matrix.hostname.com as homeserver URL)
        # add_header Access-Control-Allow-Origin '*';
        default_type application/json;
        return 200 '{ "m.homeserver": { "base_url": "https://chat.liyp.cc" } }';
    }

    location /_matrix {
        proxy_pass http://monolith;
    }
}
重载Nginx:
nginx -s reload
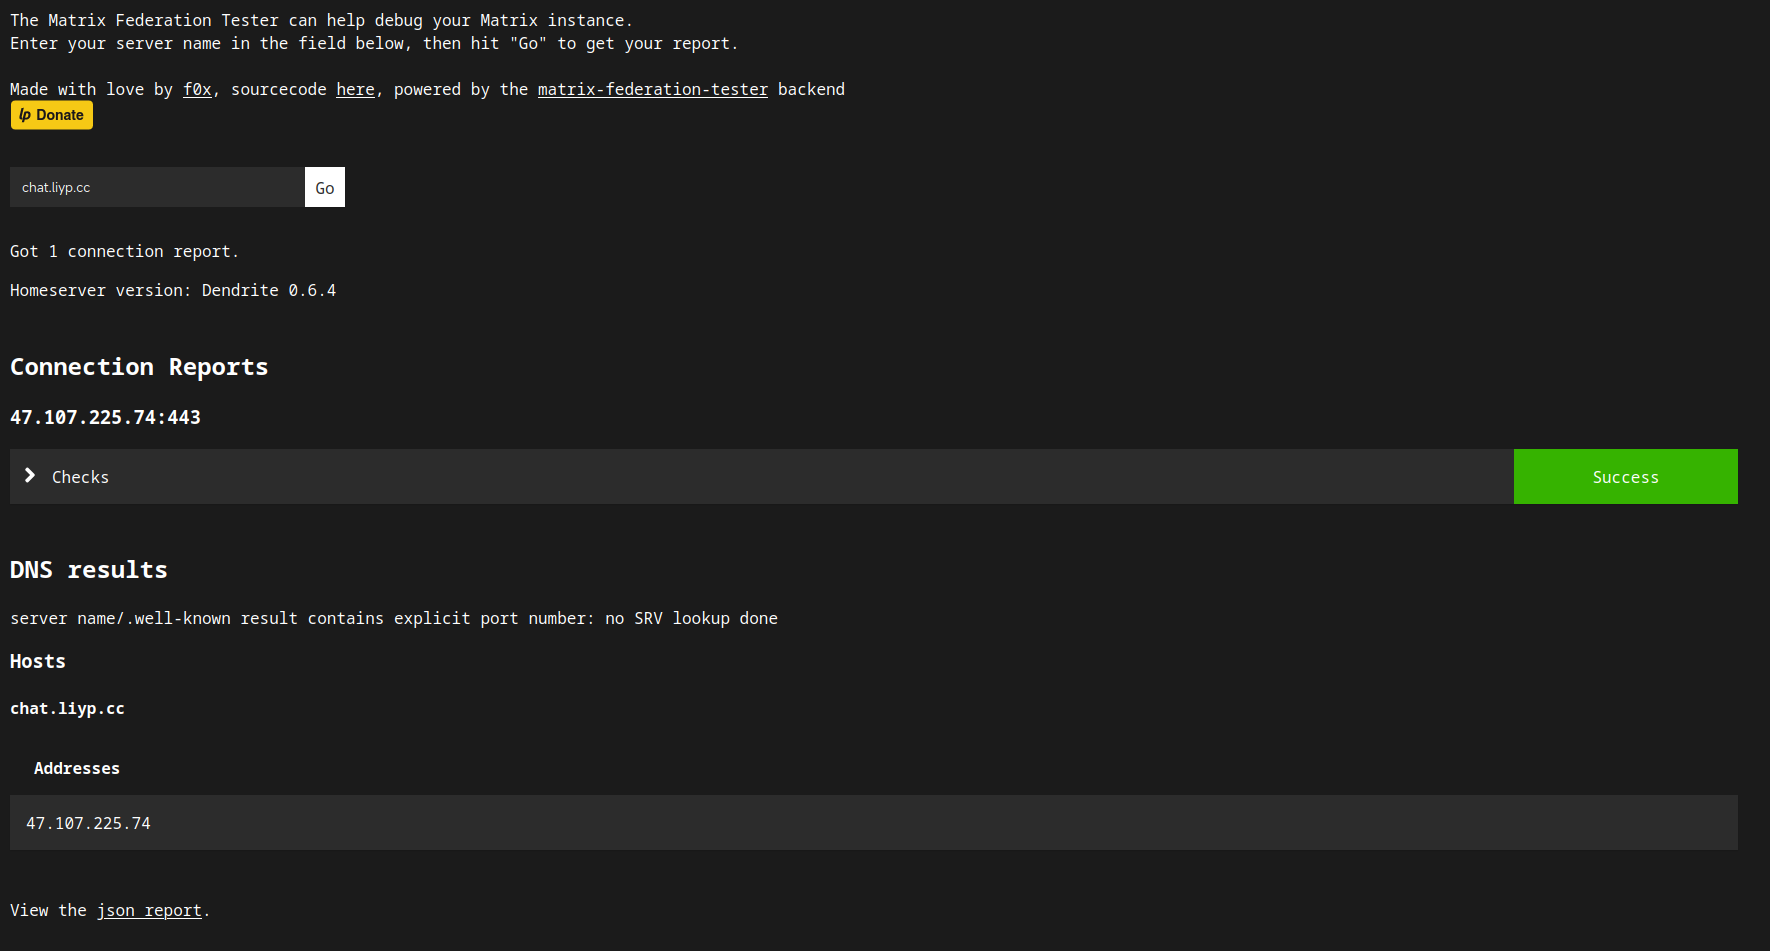
测试结果
去 https://federationtester.matrix.org/ 输入自己的的域名(chat.liyp.cc) 测试一下
如果 checks 显示绿色的 Success 就说明成功啦!
祝你好运!你已经可以实现跨服聊天了!
参考链接🔗: