在archlinux部署Syncthing并使用nginx部署webdav服务
在archlinux部署Syncthing并使用nginx部署webdav服务
从最初的坚果云,到自建
NextCloud再到Seafile,都使用过很长时间,主要是需要他们的WebDav服务,但是由于坚果云按流量收费,NextCloud使用PHP,Seafile文件乱放,后来就测试使用了Seafile+Nginx的WebDav插件解决。下面写配置过程:
安装Syncthing
除了需要安装 Syncthing外还需要安装发现服务 syncthing-discosrv和中继服务 syncthing-relaysrv,因为默认的公共地址体验极差。
pacman -S syncthing syncthing-discosrv syncthing-relaysrv
安装后 Syncthing主服务可以之前启动,其他两个如果需要配置域名,就需要额外配置。同时需要放行一些端口:TCP:21027、22070、22000、22067。UDP:22000
systemctl status [email protected] ## 使用root用户启动
其他两个服务需要修改一下,先将软件自带的服务复制到 /etc目录下,这里的服务优先级大于 /usr下
cp /usr/lib/systemd/system/syncthing-discosrv.service /etc/systemd/system/
cp /usr/lib/systemd/system/syncthing-relaysrv.service /etc/systemd/system/
修改后的服务如下:
> cat /etc/systemd/system/syncthing-discosrv.service
[Unit]
Description=Syncthing discovery server
After=network.target

[Service]
User=syncthing-discosrv
Group=syncthing-discosrv
ExecStart=/usr/bin/syncthing-discosrv -debug -http
WorkingDirectory=/var/lib/syncthing-discosrv

PrivateTmp=true
ProtectSystem=full
ProtectHome=true
NoNewPrivileges=true

[Install]
WantedBy=multi-user.target

> cat /etc/systemd/system/syncthing-relaysrv.service
[Unit]
Description=Syncthing relay server
After=network.target

[Service]
User=syncthing-relaysrv
Group=syncthing-relaysrv
ExecStart=/usr/bin/syncthing-relaysrv -pools=""
WorkingDirectory=/var/lib/syncthing-relaysrv

PrivateTmp=true
ProtectSystem=full
ProtectHome=true
NoNewPrivileges=true

[Install]
WantedBy=multi-user.target
syncthing-relaysrv.service里的 -pools=""表示不加入共享,只是私有使用。
修改之后执行 systemctl daemon-reload重新加载服务,然后就可以启动中继和发现服务。
systemctl start syncthing-discosrv.service --now
systemctl start syncthing-relaysrv.service  --now
添加Nginx配置
arch 默认的 nginx 不支持 WebDav服务,需要换主线版本并添加模块。
yay -S nginx-mainline nginx-mainline-mod-dav-ext ##如果有安装nginx包,记得替换为nginx-mainline版本
安装完 WebDav需要在 /etc/nginx/nginx.conf最上方添加配置:
load_module /usr/lib/nginx/modules/ngx_http_dav_ext_module.so;
我配置了三个nginx域名,一个是 syncthing主服务,一个是 WebDav服务,一个是发现服务器。
syncthing主服务只需要监听8384服务即可:
## 其他配置
...
 # reverse proxy
        location / {
                proxy_pass http://127.0.0.1:8384;
                #root /srv/http/reference/dist;
                proxy_connect_timeout   120s;
                proxy_send_timeout      120s;
                proxy_read_timeout      120s;

        #       proxy_set_header Host                           $host;
                proxy_set_header X-Real-IP                      $remote_addr;
                proxy_set_header X-Forwarded-For        $proxy_add_x_forwarded_for;
                proxy_set_header X-Forwarded-Proto      $scheme;
        }
...
##其他配置
发现服务discovery的配置,需要配置SSL证书。
      ##其他配置
	 .....
       # HTTP 1.1 support
        proxy_http_version 1.1;
        proxy_buffering off;
        proxy_set_header Host $http_host;
        proxy_set_header Upgrade $http_upgrade;
        proxy_set_header Connection $http_connection;
        proxy_set_header X-Real-IP $remote_addr;
        proxy_set_header X-Client-Port $remote_port;
        proxy_set_header X-Forwarded-For $proxy_add_x_forwarded_for;
        proxy_set_header X-Forwarded-Proto $http_x_forwarded_proto;
        proxy_set_header X-SSL-Cert $ssl_client_cert;

        ssl_verify_client optional_no_ca;
        # OCSP stapling
        ssl_stapling on;
        ssl_stapling_verify on;
        # HSTS (ngx_http_headers_module is required) (63072000 seconds)
        add_header Strict-Transport-Security "max-age=63072000" always;

        # reverse proxy

        location / {
                proxy_pass http://127.0.0.1:8443;
        }


        location /robots.txt {
                alias /etc/nginx/server/robots.txt;
        }
	....
##其他配置
WebDav的 nginx 配置:
        # reverse proxy
        location / {

                #create_full_put_path on;
                autoindex on;
                autoindex_exact_size off;
                autoindex_localtime on;
                charset utf-8;
                # 认证方式
                auth_basic              realm_name;
                # 存放认证用户名、密码文件(确认有对应权限)
                #auth_basic “Restricted webdav”;
                auth_basic_user_file    /etc/nginx/passwd/webdavpasswd;
                # webdav服务访问的根目录
                root /Syncthing; ##这里修改你要同步的目录
                #rewrite ^/dav/(.*)$ /$1 break;
                # dav allowed method
                dav_methods     PUT DELETE MKCOL COPY MOVE;

                # Allow current scope perform specified DAV method
                dav_ext_methods PROPFIND OPTIONS LOCK UNLOCK;
                #dav_ext_lock zone=general;
                dav_access      user:rw group:rw all:rw;
                # Temporary folder
                client_body_temp_path   /tmp/webdav;
                # MAX size of uploaded file, 0 mean unlimited
                client_max_body_size    0;
                # Allow autocreate folder here if necessary
                create_full_put_path    on;
        }
修改配置里的 root /Syncthing;为你要同步的目录。注意这里需要设置目录为所有用户可以读写,因为 Syncthing 使用的是 root 用户, nginx 的不是 root用户会导致权限问题报错。
如果要创建 nginx 的密码需要安装 apache这个包,里面有个 htpasswd命令。如果要创建一个 root用户,保存在 /etc/nginx/passwd/webdavpasswd目录,可以使用 htpasswd -c /etc/nginx/passwd/webdavpasswd root,然后输入密码即可。
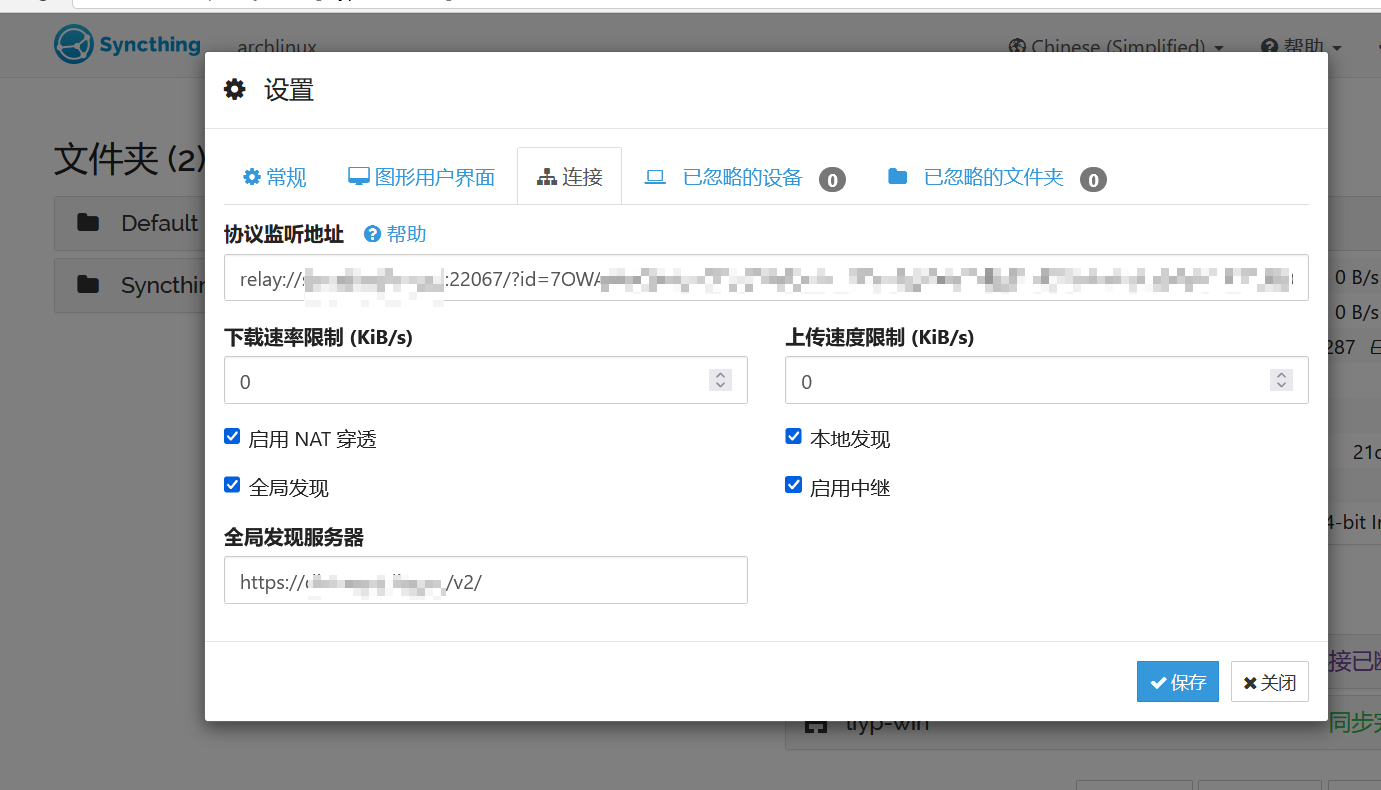
Syncthing前台配置

登录后在操作-设置-连接填写信息,协议监听地址使用 relay://syncthing.test.com:22067/?id=XXXXX,后面的ID是根据 systemctl status syncthing-relaysrv.service查看日志,有类似 # Server device ID is DG5LEG6-5YUOBMY-33IYXFE-EIRQW4E-MADRY5R-XRSCBKX-H7QSTCB-6M2KXAW字样,就是 device id ,替换即可,全局发现服务器填写nginx配置的域名,如 https://discovery.test.com/v2,注意,后面的 /v2/ 是必须要的。